Installing Corrugated Steel Siding A DIY Guide
Installing corrugated steel siding offers a durable and stylish exterior for your home or building. This guide walks you through the entire process, from initial planning and material selection to the final finishing touches. We’ll cover everything you need to know to tackle this project successfully, whether you’re a seasoned DIYer or a first-timer. Get ready to transform your building’s exterior with this strong and attractive siding option!
We’ll explore the different types of corrugated steel siding available, detailing their pros and cons, and providing a realistic assessment of the time and effort involved. We’ll also cover crucial aspects like proper framing, sheathing, and the correct installation techniques to ensure a watertight and long-lasting finish. Safety is paramount, so we’ll discuss necessary safety precautions throughout the process.
Understanding Corrugated Steel Siding

Source: rpsmetalroofing.com
Corrugated steel siding is a popular choice for both residential and commercial buildings due to its durability and relatively low cost. Understanding its different types, advantages, disadvantages, and maintenance needs is crucial for making an informed decision. This section will delve into the specifics of corrugated steel siding to help you assess its suitability for your project.
Types of Corrugated Steel Siding
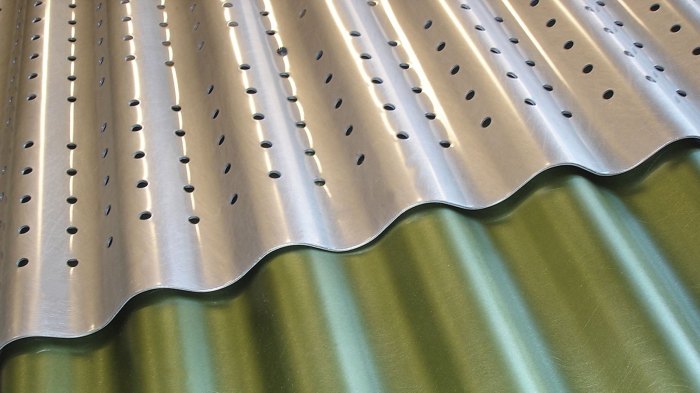
Corrugated steel siding comes in a variety of options, each affecting its performance and aesthetic appeal. The key factors to consider are gauge, material composition, and coating. The gauge refers to the thickness of the steel, with lower gauges indicating thicker, more durable material. Thicker steel is more resistant to dents and damage. Material composition typically involves steel alloys designed for weather resistance and longevity. Finally, coatings protect the steel from corrosion and provide a range of colors and finishes.
- Gauge: Common gauges range from 26 to 29, with 26 gauge being the thickest and most durable. Thinner gauges are more affordable but less resistant to damage.
- Material Composition: Galvanized steel is a common base material, offering good corrosion resistance. Galvalume, an alloy of aluminum and zinc, provides even better corrosion protection. Steel can also be treated with other alloys for enhanced strength and durability.
- Coating Options: Paint coatings provide color and additional protection against the elements. Powder coatings are generally more durable than liquid paints. Other coatings may offer additional benefits such as UV resistance or enhanced reflectivity.
Advantages and Disadvantages of Corrugated Steel Siding
Compared to other siding materials like vinyl, wood, or fiber cement, corrugated steel offers distinct advantages and disadvantages.
- Advantages: Corrugated steel siding is exceptionally durable and resistant to damage from impacts, high winds, and insects. It’s also fire-resistant, low-maintenance, and relatively inexpensive compared to some other options. Its longevity contributes to long-term cost savings.
- Disadvantages: Steel siding can dent, though thicker gauges mitigate this risk. It can also be susceptible to scratching, though this is primarily cosmetic. Additionally, it can be noisy during heavy rain or hail. Finally, the appearance might not be aesthetically pleasing to everyone, although modern coatings and profiles offer a wide range of styles.
Lifespan and Maintenance of Corrugated Steel Siding
With proper installation and maintenance, corrugated steel siding can last for several decades. A well-maintained steel siding system on a properly constructed building could easily last 50 years or more, significantly exceeding the lifespan of many other siding materials. Regular maintenance is minimal and primarily involves inspecting the siding for any damage and cleaning it periodically to remove dirt and debris. Addressing any damage promptly prevents further deterioration. For example, a small dent should be repaired as soon as possible to prevent rust from forming. Regular cleaning, perhaps once or twice a year, helps maintain its appearance and protect against corrosion.
Planning and Preparation
Proper planning and preparation are crucial for a successful corrugated steel siding installation. Failing to adequately prepare can lead to wasted materials, installation difficulties, and an ultimately unsatisfactory result. This section outlines the steps needed to ensure a smooth and efficient installation process.
Pre-Installation Checklist
A comprehensive checklist ensures you’ve addressed all necessary steps before beginning installation. Overlooking even minor details can significantly impact the outcome. This checklist provides a structured approach to pre-installation preparation.
- Structure Assessment: Inspect the existing structure for any damage, rot, or unevenness that needs repair before siding installation. Address any issues like warped framing or damaged sheathing. This will provide a stable base for the new siding.
- Measurements and Calculations: Accurately measure the wall area requiring siding. Account for windows, doors, and other openings. Add extra material for cuts and waste (typically 5-10%). This ensures you have enough material to complete the project.
- Flashing and Trim Preparation: Ensure you have the necessary flashing materials (e.g., J-channel, corner trim, Z-flashing) to protect against water penetration at edges, corners, and around windows and doors. Pre-cut flashing pieces to save time during installation.
- Substrate Preparation: Clean the existing wall surface thoroughly, removing any dirt, debris, loose paint, or other obstructions. Ensure the wall is dry and free of any materials that could interfere with adhesion or create uneven surfaces.
- Building Permits (if required): Check with your local building authority to determine if permits are required for this project. Obtain all necessary permits before starting the installation to avoid potential legal issues.
- Safety Precautions: Plan your work area to ensure safe access and movement. Use appropriate safety equipment throughout the entire installation process.
Tools and Materials
Having the right tools and materials readily available will streamline the installation process. This list includes essential items and safety equipment. Remember to check for any specific requirements based on your chosen siding and installation method.
- Safety Equipment: Safety glasses, work gloves, hearing protection, and a sturdy ladder.
- Measuring and Cutting Tools: Measuring tape, chalk line, metal shears, tin snips, and a circular saw (with a metal-cutting blade).
- Fasteners: Appropriate screws or nails for your siding type. Self-tapping screws are commonly used for corrugated steel siding.
- Installation Tools: Drill, screwdriver (or impact driver), level, and a speed square.
- Other Materials: Corrugated steel siding panels, flashing, trim, sealant, and any necessary underlayment.
Sample Material List (100 sq ft wall)
This is an example and quantities may vary depending on your specific needs and waste factor. Always purchase extra materials to account for cuts and potential mistakes.
| Item | Quantity | Unit | Cost |
|---|---|---|---|
| Corrugated Steel Siding | 110 | sq ft | $XXX |
| Self-tapping Screws | 500 | pcs | $XX |
| J-Channel | 20 | linear ft | $X |
| Corner Trim | 10 | linear ft | $X |
| Sealant | 1 | tube | $X |
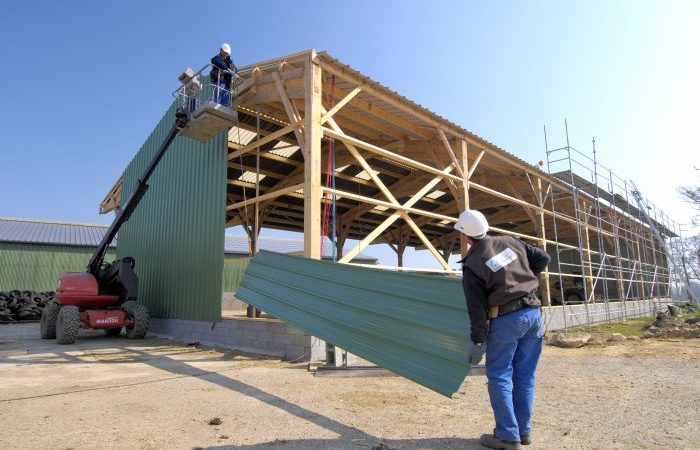
Installation Process: Installing Corrugated Steel Siding
Getting started with the actual installation of your corrugated steel siding involves two crucial preliminary steps: framing and sheathing. Properly preparing the underlying structure is essential for a long-lasting, aesthetically pleasing, and structurally sound installation. Neglecting these steps can lead to issues ranging from unsightly gaps and leaks to compromised structural integrity.
Framing and sheathing create the foundation upon which your siding will be mounted. Think of it as building a strong and level platform for your new exterior. This section details the best practices for achieving this.
Framing for Corrugated Steel Siding
Framing for corrugated steel siding requires a solid, straight, and properly spaced framework. The framing members, typically wood studs or metal framing, provide the support for the sheathing and ultimately the siding itself. The spacing of these framing members is critical and will depend on the specific requirements of your chosen siding and local building codes. However, a common practice is to space the framing members 16 inches on center (o.c.). This allows for the proper support and prevents sagging or bowing of the sheathing. Ensure all framing members are plumb and level to create a flat surface for the sheathing. Using a level and a plumb bob is essential during this stage to ensure accuracy. Any imperfections in the framing will be amplified and visible in the final siding installation. Remember to account for any openings for windows and doors, ensuring that the framing around these openings is adequately reinforced to prevent weakness.
Sheathing Material Selection and Installation
The sheathing material acts as a substrate for the corrugated steel siding. Its primary purpose is to provide a uniform, stable surface for the siding to be attached to, creating a solid, weather-resistant barrier. Common sheathing materials include plywood, oriented strand board (OSB), and even solid lumber in some applications. The choice depends on factors such as budget, local building codes, and personal preference. Plywood and OSB are popular choices due to their strength, affordability, and ease of installation. Regardless of the chosen material, the sheathing must be installed properly. This involves ensuring all sheets are tightly fastened to the framing, with no gaps or overlaps. Proper nailing patterns are crucial to prevent the sheathing from warping or twisting. Additionally, the sheathing should be installed with the proper orientation, often indicated on the sheets themselves, to maximize strength and weather resistance.
Accounting for Expansion and Contraction
Corrugated steel siding, like most metals, expands and contracts with temperature fluctuations. Failing to account for this movement can lead to buckling, warping, and even damage to the siding. Proper installation techniques are essential to mitigate these effects. One crucial method is to leave appropriate expansion gaps between the siding and any fixed elements, such as corners, trim, or doors and windows. These gaps should be sized according to the manufacturer’s recommendations, which are usually specified in the siding’s installation instructions. These gaps allow the siding to move freely without putting stress on the fastening system. Another consideration is the use of appropriate fasteners. Using fasteners that allow for a degree of movement, such as self-tapping screws with a slight amount of play, can help to prevent damage caused by expansion and contraction. For example, a common practice is to leave a 1/4 inch gap between the siding and the ends of the building. The size of this gap can vary depending on the climate and the length of the siding runs. Furthermore, the use of sealant around penetrations and joints helps prevent moisture intrusion.
Installation Process: Installing Corrugated Steel Siding
Now that you’ve prepped everything, it’s time to get those steel panels up! This section will walk you through the actual installation, covering fastening techniques, common problems, and how to handle tricky cuts around openings. Remember safety first – always wear appropriate safety gear, including gloves and eye protection.
Applying corrugated steel siding is a straightforward process, but precision and attention to detail are key for a professional-looking finish. Proper fastening is crucial to prevent leaks and ensure the longevity of your siding. We’ll cover various fastening techniques and address common installation challenges.
Siding Panel Installation
Begin by installing the first panel at a corner or edge, aligning it with your reference line. Secure the panel using self-drilling screws, ensuring they are spaced evenly and penetrate the framing members. The spacing of your screws will depend on the manufacturer’s recommendations and local building codes. Typically, screws are placed every 12 inches, but always consult your specific siding’s instructions. Over-tightening can damage the panels, so use a consistent amount of pressure.
Continue installing panels, overlapping each subsequent panel by the recommended amount (usually specified by the manufacturer). Maintain consistent alignment and spacing throughout the installation. Use a level to ensure panels remain plumb and straight. Remember to use appropriate length screws for the thickness of your sheathing and siding.
Fastening Techniques
The type of fastener you use will depend on the type of steel siding and the climate you live in. Generally, self-drilling screws with a weather-resistant coating are preferred. These screws are designed to penetrate both the siding and the underlying sheathing without pre-drilling. However, some manufacturers might recommend using different fasteners, so always follow their guidelines. Incorrect fastening can lead to leaks, rust, and damage to the siding.
Avoid driving screws too tightly, which can deform the panels and create stress points. Use a consistent amount of pressure and ensure screws are fully seated but not overly tightened. This prevents damage to the panels and ensures a secure installation.
Common Challenges and Solutions
Several challenges might arise during installation. Here are some common issues and their solutions:
- Panel Misalignment: Carefully check alignment with a level throughout the installation process. If misalignment occurs, carefully remove and reposition the affected panels.
- Screw Holes Not Aligning: Pre-plan your panel placement to avoid this. Use a chalk line or laser level to ensure panels are accurately positioned before fastening.
- Difficult Cuts: Use specialized metal cutting tools (see below) to ensure clean, precise cuts.
- Weather Conditions: Avoid installation during extreme temperatures (very hot or very cold) as this can affect the material and fastening.
Cutting and Trimming Techniques, Installing corrugated steel siding
Cutting corrugated steel siding requires specialized tools to prevent damage to the panels and ensure a clean cut. Here are a few methods:
- Circular Saw with Metal-Cutting Blade: This is a common method for cutting straight lines. Use a slow, steady speed and ensure the blade is sharp to prevent tearing or bending the metal.
- Nibblers: These tools are excellent for making intricate cuts around windows and doors. They punch out small sections of metal, creating a clean cut without excessive force or heat.
- Jigsaw with Metal-Cutting Blade: A jigsaw can be used for curved cuts, but it’s important to use a fine-tooth blade designed for metal to avoid tearing the edges.
- Tin Snips: For smaller cuts or adjustments, tin snips can be helpful, but they’re less efficient for larger sections.
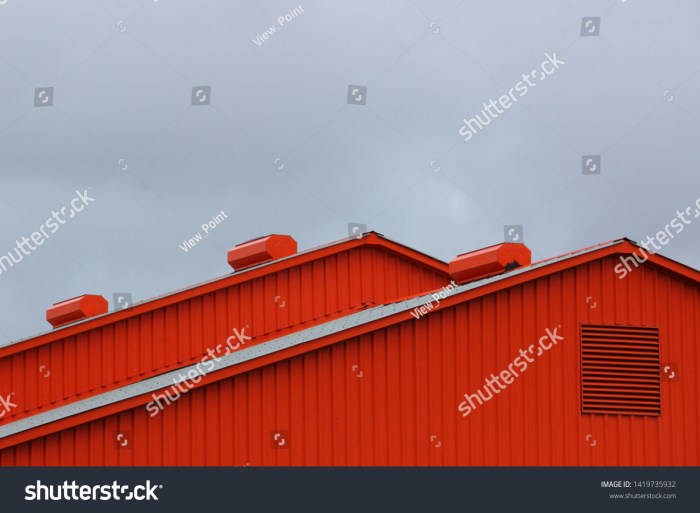
Finishing Touches and Details
Source: mozdesigns.com
Now that the main installation of your corrugated steel siding is complete, it’s time to focus on the finer details that will ensure a long-lasting, weatherproof, and aesthetically pleasing finish. These finishing touches are crucial for protecting your investment and achieving a professional look. Properly installed trim, flashing, and sealed seams are the key to preventing water damage and ensuring your siding’s longevity.
Properly installing trim, flashing, and sealing seams are essential steps in completing your corrugated steel siding project. These elements not only enhance the visual appeal but also provide critical protection against the elements. Neglecting these details can lead to costly repairs down the line.
Trim Piece Installation
Trim pieces, such as corner pieces, J-channel, and end caps, are essential for a clean and professional finish. They protect the raw edges of the siding, providing a neat appearance and preventing water intrusion. Corner pieces, for example, are designed to neatly cover the outside corners of your structure, creating a seamless transition between siding panels. J-channel is used to finish the edges of the siding around windows and doors. End caps are used to seal the ends of the siding runs, providing a finished look and preventing moisture from entering. Installation typically involves securing the trim pieces to the underlying structure using appropriate fasteners, ensuring a tight and weatherproof fit. Always refer to the manufacturer’s instructions for specific installation guidelines.
Flashing Installation
It’s installed under the siding to create a barrier against water. Proper flashing installation involves overlapping pieces to ensure complete water coverage and directing water flow away from the building. Critically, the flashing should extend beyond the edges of the siding to prevent water from getting behind it. Improper flashing can lead to water damage and rot, so meticulous attention to detail is essential.
Seam and Joint Sealing
Sealing seams and joints is crucial to prevent water penetration. This is achieved using a high-quality sealant specifically designed for exterior use and compatible with the metal siding material. The sealant should be applied to all seams and joints, ensuring complete coverage and a weathertight seal. This process prevents moisture from entering behind the siding and causing damage to the underlying structure. A bead of sealant should be applied evenly along the seam, creating a continuous barrier. Allow the sealant to fully cure before exposing it to rain or other moisture.
Corner Pieces and End Caps
Properly installed corner pieces create a sharp, clean, and visually appealing transition at the exterior corners of the building. They consist of pre-formed pieces designed to fit snugly over the ends of the siding panels, covering the raw edges and creating a continuous, unbroken line. Imagine a perfectly mitered corner, neatly concealing the ends of the siding panels and presenting a strong, unified aesthetic. The corner pieces are typically secured with screws or rivets, ensuring a durable and watertight connection. End caps serve a similar function at the termination points of siding runs, providing a finished and protected edge. They are typically installed in the same manner as corner pieces, ensuring a weatherproof and visually pleasing finish. Both corner pieces and end caps are crucial for preventing water damage and enhancing the overall appearance of the siding installation.
Safety Precautions

Source: rpsmetalroofing.com
Installing corrugated steel siding might seem straightforward, but it involves working at heights, handling sharp materials, and using power tools. Ignoring safety can lead to serious injury. This section details crucial safety measures to ensure a safe and successful installation.
Safe practices are paramount throughout the entire process, from initial material handling to final cleanup. Failing to prioritize safety can result in accidents ranging from minor cuts to severe injuries. Always remember that a safe work environment is a productive work environment.
Potential Hazards and Safety Measures
Working with corrugated steel siding presents several potential hazards. These include sharp edges and points on the steel sheets themselves, the risk of falls from ladders or scaffolding, potential injuries from power tools, and exposure to the elements. To mitigate these risks, always use appropriate personal protective equipment (PPE), maintain a clean and organized work area, and follow safe work practices. For example, ensure secure footing when working at heights and use appropriate safety harnesses and fall protection systems. When using power tools, always wear eye protection and hearing protection. Furthermore, keep the work area free of debris to prevent tripping hazards.
Material Handling and Waste Disposal
Corrugated steel sheets are heavy and can be unwieldy. Use appropriate lifting techniques to avoid back injuries. Never attempt to lift more than you can comfortably handle. Employ mechanical assistance like a forklift or hand truck for larger quantities. Disposal of waste materials, including scrap steel and packaging, should adhere to local regulations. Properly dispose of sharp scrap pieces in puncture-resistant containers to prevent accidental injuries. Many recycling centers accept corrugated steel, making environmentally friendly disposal a viable option.
Personal Protective Equipment (PPE)
Appropriate PPE is essential for a safe installation. This includes:
- Safety glasses or goggles to protect your eyes from flying debris and sparks from power tools.
- Work gloves to protect your hands from cuts and abrasions from sharp steel edges.
- Hearing protection (earplugs or earmuffs) to reduce the noise from power tools.
- A hard hat to protect your head from falling objects.
- Steel-toed boots to protect your feet from dropped materials.
- A dust mask or respirator to protect your lungs from dust and fumes generated during cutting or drilling.
- Fall protection equipment (harness, lanyard, and anchor points) when working at heights.
Remember, the use of PPE is not optional; it is mandatory for any work involving corrugated steel siding installation. Invest in high-quality PPE and ensure it fits correctly for optimal protection.
Summary
Source: shutterstock.com
With careful planning and attention to detail, installing corrugated steel siding can be a rewarding DIY project. Remember, proper preparation is key to a successful outcome. By following the steps outlined in this guide, you can confidently transform your building’s exterior with a durable and attractive corrugated steel siding installation that will stand the test of time. So grab your tools, and let’s get started!
Q&A
What’s the best way to clean corrugated steel siding?
A simple pressure washer with a low-pressure nozzle and mild detergent usually does the trick. Avoid harsh chemicals.
How do I deal with dents or scratches in the siding?
Minor dents can often be popped out carefully. For scratches, touch-up paint designed for your specific siding is a good solution.
Can I install corrugated steel siding over existing siding?
It depends on the existing siding’s condition and type. It’s often best to remove old siding for a better, more secure installation.
How much does corrugated steel siding cost per square foot?
Pricing varies widely based on gauge, material, and coating. Expect to pay anywhere from a few dollars to over ten dollars per square foot.
What’s the best time of year to install corrugated steel siding?
Moderate temperatures are ideal. Avoid extreme heat or cold, and make sure the weather forecast is dry.
Comments are closed.