Installing Corrugated Metal Siding A DIY Guide
Installing corrugated metal siding might sound daunting, but with the right plan and approach, it’s a doable DIY project. This guide walks you through every step, from initial planning and material selection to the final finishing touches. We’ll cover everything from choosing the right type of siding for your climate to mastering those tricky corner cuts. Get ready to transform your building’s exterior with a durable and stylish metal finish!
This comprehensive guide breaks down the process into manageable sections, providing clear instructions and helpful tips along the way. We’ll explore different installation methods, discuss essential safety precautions, and even offer solutions to common problems. By the end, you’ll be confident in your ability to install your corrugated metal siding.
Planning and Preparation for Corrugated Metal Siding Installation
Installing corrugated metal siding is a rewarding project that can significantly enhance your home’s curb appeal and durability. However, proper planning and preparation are crucial for a successful and efficient installation. Careful measurement, material selection, and site preparation will save you time, money, and frustration in the long run.
Necessary Tools and Materials
Before you begin, gather all the necessary tools and materials. This will streamline the process and prevent interruptions. Having everything readily available will make the installation much smoother. A comprehensive list will vary slightly depending on the complexity of your project, but generally includes: measuring tape, level, chalk line, safety glasses, work gloves, tin snips, drill with appropriate drill bits, screws, sealant, flashing, underlayment (if needed), and of course, the corrugated metal siding itself. You might also need a roofing nail gun for faster installation, depending on the chosen material. Don’t forget ladders and scaffolding if working at height.
Measuring and Calculating Siding Requirements
Accurate measurement is paramount to avoid material waste and ensure a perfect fit. Begin by meticulously measuring the total surface area of the walls that will receive the siding. Account for all windows, doors, and other openings. Draw a detailed sketch of your house’s exterior, including all dimensions and relevant features. Add extra material to account for cuts, waste, and potential errors. A good rule of thumb is to add 5-10% extra to your calculated amount. For example, if your calculations indicate you need 100 square feet of siding, order 105-110 square feet to be safe.
Site Preparation
Proper site preparation is fundamental to a successful installation. A clean and level surface is essential for a neat and durable finish. Begin by thoroughly cleaning the existing wall surface. Remove any loose paint, debris, or old siding. Any unevenness in the wall surface should be addressed before installation. Use shims or other leveling materials to ensure a smooth, even surface for the siding to rest upon. This will prevent issues with alignment and prevent sagging or buckling of the siding over time.
Creating a Detailed Installation Plan
Develop a detailed installation plan with diagrams. This plan should include measurements, material quantities, and a step-by-step installation sequence. A well-thought-out plan will act as your guide throughout the process. Include details such as the orientation of the siding panels, the location of fasteners, and any special considerations for corners, windows, and doors. Consider creating separate diagrams for different wall sections to break down the project into manageable parts. This will help prevent confusion and ensure a consistent installation.
Comparison of Corrugated Metal Siding Materials
Different materials offer varying properties and suit different climates. The choice depends on your budget, desired aesthetic, and local environmental conditions.
| Material | Durability | Cost | Climate Suitability |
|---|---|---|---|
| Steel | High, strong and resistant to dents | Moderate to High | Suitable for most climates, but susceptible to rust in highly humid environments. |
| Aluminum | Good, lightweight and corrosion-resistant | High | Excellent for coastal areas and regions with high humidity due to its corrosion resistance. |
| Zinc | High, naturally corrosion-resistant and self-healing | Very High | Suitable for all climates, particularly those with high humidity or extreme temperature fluctuations. Develops a protective patina over time. |
Framing and Sheathing Considerations
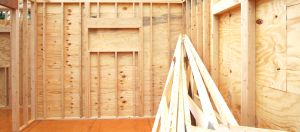
Getting the framing and sheathing right is crucial for a long-lasting, weatherproof corrugated metal siding installation. Proper support prevents sagging and ensures the siding sits correctly, while the sheathing acts as a base layer protecting your structure and providing a surface for fastening. Ignoring these steps can lead to problems ranging from unsightly imperfections to significant water damage.
Corrugated metal siding needs a solid, consistent base. The framing must be straight, plumb, and properly spaced to support the weight of the siding and withstand wind loads. Framing members should be strong enough to handle the potential stresses, especially in areas prone to high winds or heavy snow. Commonly used framing lumber for this purpose includes pressure-treated lumber or engineered wood products, selected based on local building codes and the specific project requirements. The spacing between studs is determined by local building codes and the type of sheathing used.
Wall Framing Requirements for Corrugated Metal Siding
Proper wall framing ensures the structural integrity of your building and provides a stable surface for the siding installation. This involves using appropriately sized lumber, spaced according to building codes, and ensuring the framing is plumb and square. This is essential to avoid issues like sagging or uneven siding, which can compromise both aesthetics and weather resistance. Using a level and plumb bob during framing is highly recommended to ensure accuracy. Incorrect framing can lead to significant problems later on, so take your time and get it right. The type of sheathing used will also influence the framing requirements, so consult local building codes for specific details relevant to your project.
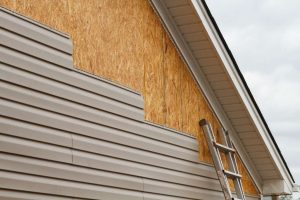
Sheathing Options and Their Impact on Installation
Several sheathing materials are suitable for use under corrugated metal siding, each with its advantages and disadvantages. Common choices include plywood, OSB (oriented strand board), and fiber cement. Plywood and OSB are cost-effective but can be susceptible to moisture damage if not properly protected. Fiber cement is more durable and moisture-resistant but generally more expensive. The choice of sheathing will affect the fastening techniques used for both the sheathing itself and the subsequent siding installation. The sheathing also plays a critical role in providing a uniform surface for the siding and contributes to the overall structural integrity of the wall.
Sheathing Installation: A Step-by-Step Guide
Installing sheathing involves several key steps to ensure a proper and long-lasting installation. The process begins with careful planning, measuring, and cutting the sheathing panels to the appropriate size. Proper fastening is crucial for a secure and stable installation.
- Start by installing the sheathing panels, ensuring they are properly aligned and butted tightly together. Leave appropriate expansion gaps as recommended by the manufacturer.
- Use corrosion-resistant nails or screws specifically designed for the type of sheathing and the climate. The fasteners should be driven straight and flush to avoid protruding and damaging the siding during installation.
- Follow the manufacturer’s recommended spacing for fasteners to ensure proper support and prevent racking. This spacing will vary depending on the sheathing material, panel size, and local building codes.
- Stagger the joints between adjacent panels to distribute the load and increase structural stability. This helps prevent weak points in the sheathing and ensures even support for the siding.
- Carefully inspect the installed sheathing for any gaps, misalignments, or damaged panels before proceeding to the next stage of the installation.
Moisture Barrier Installation
A moisture barrier is essential to prevent water damage and maintain the integrity of your building. This layer sits between the sheathing and the siding, preventing moisture from penetrating the wall assembly. Common moisture barrier materials include house wrap, polyethylene sheeting, and various specialized breathable membranes. Proper installation involves overlapping seams and sealing all penetrations to ensure a continuous barrier. Failing to install a proper moisture barrier can lead to mold, rot, and structural damage.
Install the moisture barrier, ensuring complete coverage and proper overlapping of seams, typically with a minimum 6-inch overlap. Use appropriate tape to seal all seams and penetrations. Remember to maintain a continuous barrier from the bottom to the top of the wall, ensuring no gaps or openings that can allow moisture to penetrate.
Flashing Installation Around Windows and Doors
Flashing is critical in preventing water infiltration around openings like windows and doors. Proper flashing directs water away from these vulnerable areas. This typically involves using flashing materials such as metal flashing or self-adhesive flashing tape. The flashing should be installed to create a watertight seal, overlapping the sheathing and extending beyond the window or door frame.
Install flashing around windows and doors according to manufacturer’s instructions. Ensure proper overlap and sealing of all seams to create a watertight barrier. The flashing should extend beyond the window or door frame to direct water away from the opening. Pay close attention to the details, ensuring no gaps or openings remain that could allow water penetration.
Siding Installation Techniques
Installing corrugated metal siding can seem daunting, but with the right approach and tools, it’s a manageable DIY project. This section details the techniques for installing this durable and stylish siding, covering various installation methods, cutting and fitting procedures, fastening techniques, and common problem-solving strategies. Remember safety first – always wear appropriate safety gear, including gloves and eye protection.
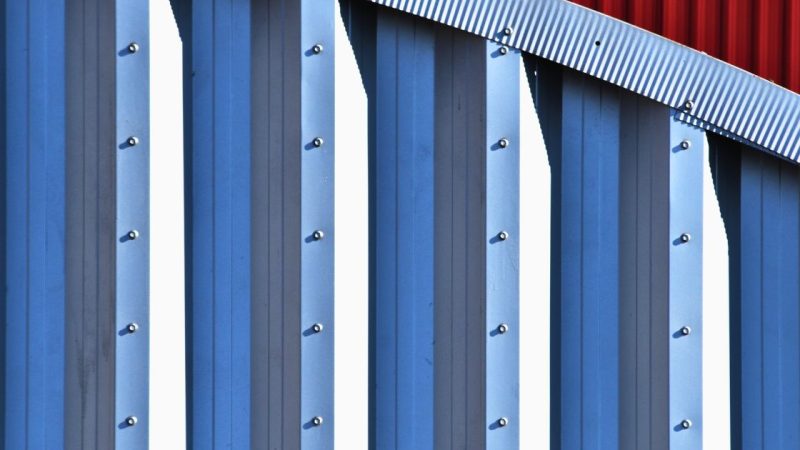
Horizontal and Vertical Installation Methods
Corrugated metal siding can be installed either horizontally or vertically, each offering a distinct aesthetic appeal. Horizontal installation is more common, mimicking traditional wood siding, while vertical installation provides a more modern, contemporary look. The installation process is largely similar for both, but the orientation of the panels and the direction of the fasteners will differ. For horizontal installation, panels are placed horizontally, overlapping from bottom to top. Vertical installation involves placing panels vertically, with overlapping from left to right. The choice depends on personal preference and the overall design of the building. Consider the building’s orientation to the sun – horizontal installation might provide better shade in certain climates.
Cutting and Fitting Around Corners and Obstacles
Cutting corrugated metal siding requires specialized tools like tin snips or a circular saw with a metal-cutting blade. Accuracy is key to a clean, professional finish. When working around corners, it’s generally recommended to use pre-fabricated corner pieces for a seamless look and improved water resistance. These pieces are specifically designed to fit the profile of the siding. If using a metal cutting blade, make sure it is sharp and the saw is designed for metal to avoid damaging the blade. For obstacles like windows and doors, careful measurements and precise cuts are essential. You’ll likely need to create custom-fit pieces to ensure a tight seal around these features. Remember to always wear appropriate safety glasses when cutting metal.
Fastening Siding Panels Securely and Correctly
Securely fastening the siding panels is crucial for weather resistance and overall structural integrity. Use self-tapping screws designed specifically for metal roofing and siding. These screws have a sharp point that easily penetrates the metal, and a self-drilling thread that securely grips the material. Avoid over-tightening the screws, as this can damage the siding. The screws should be placed through the peaks of the corrugations, and spacing will depend on the manufacturer’s recommendations, typically ranging from 6 to 12 inches apart. Always use a screw that is appropriately sized for the thickness of the metal siding to avoid splitting the metal.
Fastener Selection and Application
Different fasteners are suited for different applications. Self-drilling screws are generally the best choice for most corrugated metal siding installations. However, rivets can also be used, especially in areas where a particularly strong and durable connection is needed. When choosing fasteners, consider the metal gauge of your siding and always consult the manufacturer’s instructions for recommended fasteners and spacing. Using the incorrect fasteners can compromise the structural integrity and longevity of the siding installation.
Common Installation Problems and Solutions
Proper planning and execution are key to avoiding problems, but some issues might still arise.
- Problem: Uneven siding alignment.
- Solution: Carefully measure and mark the starting point and use a level to ensure panels are installed straight and aligned.
- Problem: Gaps between panels.
- Solution: Ensure proper overlap between panels and check for any bending or warping of the panels before installation.
- Problem: Damaged siding during cutting or installation.
- Solution: Use sharp tools, work carefully, and handle the panels gently to avoid damage. Pre-drilling pilot holes before fastening can also help prevent damage.
- Problem: Leaks around corners or windows/doors.
- Solution: Ensure proper sealing around these areas using high-quality sealant. Using pre-fabricated corner pieces and flashing can also greatly reduce the likelihood of leaks.
- Problem: Loose or stripped screws.
- Solution: Use screws of appropriate length and gauge, and avoid over-tightening. If a screw is stripped, replace it immediately.
Finishing Touches and Maintenance
Once the main siding installation is complete, the finishing touches are what truly elevate the project from good to great. These final steps ensure a professional look, a weathertight seal, and long-lasting protection for your investment. Proper maintenance is also key to preserving the beauty and integrity of your corrugated metal siding for years to come.
Installing Trim and Accessories
Adding trim and accessories not only enhances the aesthetic appeal but also provides crucial protection against the elements. J-channel, for example, neatly finishes the edges of the siding where it meets other building components. Corner trim protects the corners from damage and provides a clean, finished look. These are typically installed using self-tapping screws designed for metal, ensuring a secure and watertight fit. Remember to maintain consistent spacing between screws for a professional appearance and to avoid damaging the metal. Fascia trim, which covers the ends of rafters or trusses, and soffit trim, which covers the underside of the eaves, complete the look and protect those vulnerable areas from weather damage. Proper installation of these pieces involves precise measurement and careful alignment to ensure a seamless transition between different components of the siding system.
Sealing Gaps and Openings, Installing corrugated metal siding
Preventing water infiltration is paramount. Even small gaps or openings can allow moisture to penetrate, leading to rust, corrosion, and potential structural damage. After installing the siding and trim, carefully inspect all seams, joints, and penetrations (like vents or pipes). Use a high-quality, paintable, exterior-grade sealant designed for metal applications to fill any gaps or openings. Apply the sealant liberally, ensuring complete coverage and a smooth, even bead. Allow the sealant to fully cure before exposing the area to rain or moisture. Pay particular attention to areas where the siding meets windows, doors, and other building features. These are often high-risk areas for water infiltration.
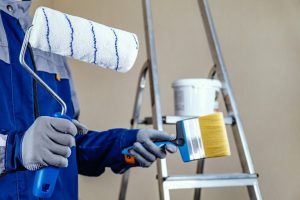
Cleaning and Maintaining Corrugated Metal Siding
Regular cleaning is crucial for maintaining the appearance and longevity of your corrugated metal siding. A simple solution of mild detergent and water, applied with a soft-bristled brush or sponge, is usually sufficient for removing dirt, grime, and debris. Rinse thoroughly with clean water to remove any soap residue. For more stubborn stains or mildew, consider using a pressure washer, but maintain a safe distance to avoid damaging the siding. Avoid abrasive cleaners or harsh chemicals, as these can scratch or damage the protective coating. For tough stains, a specialized metal cleaner can be used, but always follow the manufacturer’s instructions.
Preventing Rust and Corrosion
Corrugated metal siding, while durable, is still susceptible to rust and corrosion if not properly cared for. Regular cleaning and promptly addressing any minor scratches or damage helps prevent rust. Touch up any damaged areas with a rust-inhibiting primer and then apply a matching exterior paint. Avoid using galvanized metal fasteners in contact with dissimilar metals, as this can accelerate corrosion. For areas with high humidity or exposure to saltwater, consider using a specialized rust-inhibiting paint for added protection. Regular inspections, particularly after severe weather events, are recommended to identify and address any potential issues early on.
Visual Description of a Completed Installation
Imagine a freshly installed corrugated metal siding system. The clean lines of the corrugated panels create a modern and sleek aesthetic. The consistent color and texture provide a uniform appearance. J-channel neatly finishes the edges, while corner trim protects the corners and adds a polished look. Fascia and soffit trim complete the system, seamlessly integrating with the main siding. The entire structure looks strong, durable, and weather-resistant. The careful attention to detail in the installation, including the meticulous sealing of all gaps and openings, ensures a long-lasting, beautiful, and well-protected exterior. The overall impression is one of quality craftsmanship and a commitment to lasting value.
Safety Precautions During Installation
Installing corrugated metal siding can be a rewarding project, but it’s crucial to prioritize safety throughout the process. Metal sheeting is sharp, work often involves heights, and the tools used can be dangerous if mishandled. Taking precautions will protect you from injury and ensure a smooth, successful installation.
Potential Hazards During Corrugated Metal Siding Installation
Working at heights presents a significant risk of falls. Sharp edges of the metal sheets can cause cuts and lacerations. Improper handling of tools, such as drills, saws, and shears, can lead to injuries. Exposure to the sun and elements can also cause dehydration and heatstroke. Finally, the weight of the metal sheets themselves can pose a risk if not handled correctly. For instance, a single sheet of long-length corrugated metal can be heavy and awkward to maneuver, leading to strains or back injuries if lifted incorrectly.
Necessary Safety Equipment
Appropriate safety gear is essential. This includes sturdy work gloves to protect your hands from cuts and abrasions, safety glasses to shield your eyes from flying debris, and hearing protection to reduce noise exposure from power tools. If working at heights, a full-body harness and appropriate fall protection equipment are mandatory. Steel-toed boots provide foot protection from dropped objects and potential crushing hazards. A hard hat protects your head from falling objects. In addition, consider using dust masks to avoid inhaling metal dust or fibers during cutting.
Importance of Manufacturer’s Instructions and Safety Guidelines
Always meticulously follow the manufacturer’s instructions for the specific corrugated metal siding you are using. These instructions will often contain specific safety warnings and recommendations for installation techniques that are crucial for your safety. Ignoring these guidelines could lead to accidents, injuries, or even voiding the product warranty. Likewise, adhere to all relevant local and national safety regulations and building codes. This ensures that your project is both safe and compliant.
Safety Procedure Checklist
Before starting: Inspect all tools for damage and ensure they are in proper working order. Check the work area for any hazards, such as uneven ground or obstacles. Ensure you have all necessary safety equipment and that it is in good condition.
During installation: Use proper lifting techniques to avoid strains and injuries. Always use safety equipment, including gloves, glasses, and hearing protection. Maintain three points of contact when working at heights. Take breaks regularly to avoid fatigue. Never work alone; have a spotter or assistant available.
After installation: Inspect the completed work for any safety hazards. Dispose of all waste materials properly and safely. Clean up the work area to prevent accidents.
Proper Disposal of Waste Materials
Proper disposal of waste materials is crucial for environmental protection and worker safety. Corrugated metal siding scraps should be recycled if possible, according to your local regulations. Sharp metal pieces should be disposed of in puncture-resistant containers to prevent injury. Any leftover chemicals, such as paints or sealants, should be disposed of according to local environmental guidelines. Never simply leave waste materials at the work site.
Final Wrap-Up: Installing Corrugated Metal Siding
Installing corrugated metal siding is a rewarding project that significantly enhances your building’s curb appeal and longevity. Remember, careful planning and attention to detail are key to a successful installation. By following the steps outlined in this guide and prioritizing safety, you can achieve a professional-looking result that will stand the test of time. So grab your tools, follow our advice, and enjoy the process of transforming your building’s exterior!
Questions Often Asked
How long does corrugated metal siding last?
With proper maintenance, corrugated metal siding can last 30-50 years or even longer.
Can I install corrugated metal siding over existing siding?
Sometimes, but it depends on the condition of the existing siding and your local building codes. It’s often best to remove old siding for a better result.
What’s the best way to clean corrugated metal siding?
A simple solution of water and mild detergent usually suffices. Use a soft brush or sponge and avoid harsh chemicals.
How do I deal with expansion and contraction of the metal?
Use appropriate fasteners and allow for expansion gaps as recommended by the manufacturer to prevent buckling or damage.
What type of sealant should I use?
Use a high-quality sealant specifically designed for exterior use and compatible with metal. Follow the manufacturer’s instructions.
Comments are closed.